Table of Contents
Christmas snowflake light Circuit com touch switch SGL8022W + base. With this event, the previous color silk screen snowflake light has been upgraded once again. The overall white style is more beautiful. At the same time, the interface has been changed to a 6P plug that is easier to solder for beginners. A new base has also been designed, with a beautiful shell. The shell panel uses a transparent acrylic panel, allowing the color silk screen on the base to be clearly visible.
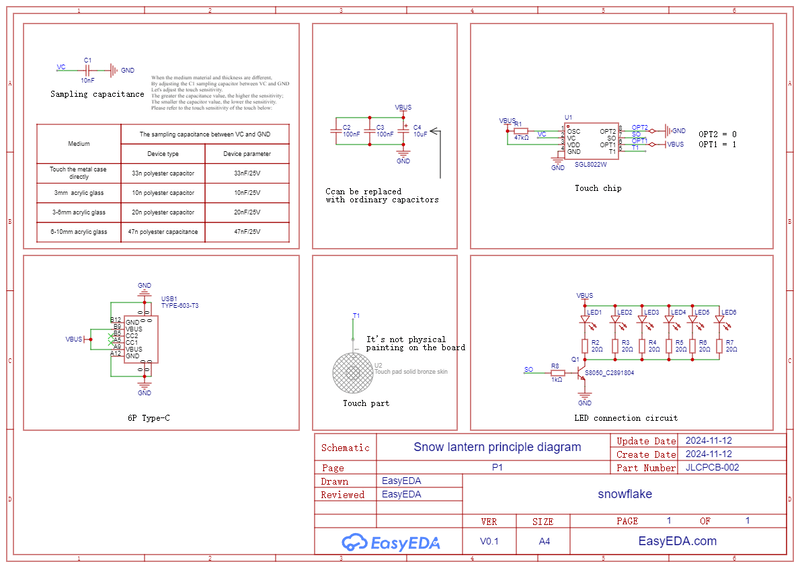
Schematic Christmas snowflake light Circuit SGL8022W


Because there is only one snowflake lamp, there is only one schematic diagram, which is very simple and clear. It can be seen that the snowflake lamp only needs the SGL8022W touch chip and a simple peripheral circuit to drive it normally. It was found in the manual that the different sizes of the sampling capacitors of the SGL8022W touch chip will affect the sensitivity of the touch, and there will be a chance to verify it later.
The snowflake lamp uses the SGL8022W touch chip and a simple peripheral circuit to drive the LED, which can adjust the LED brightness and switch control through touch. Additionally, the different states of OPT2 and OPT1 will also affect the touch effect of the SGL8022W touch chip.
There are four selectable functions, determined by the input status of the OPT1 and OPT2 pins before powering on. Specifically, as follows:
- OPT1=1, OPT2=1 corresponds to: LED touch dimming function without brightness memory, with abrupt brightness changes
- OPT1=0, OPT2=1 corresponds to: LED touch dimming function without brightness memory, with gradual brightness changes
- OPT1=1, OPT2=0 corresponds to: LED touch dimming function with brightness memory, with gradual brightness changes
- OPT1=0, OPT2=0 corresponds to: LED touch dimming function in three stages
Different power-on input conditions correspond to different touch state dimming instructions:
- LED touch dimming without brightness memory function as follows:
- When powered on initially, the light is off.
- Click touch (touch duration less than 550ms) can control the on/off of the light. One click turns the light on; another click turns it off. This cycle continues. There is no brightness buffer when the light is turned on or off. The initial brightness when the light is turned on is fixed at 50% of full brightness.
- Long press touch (touch duration more than 550ms) can achieve smooth brightness adjustment. With a long press touch, the brightness gradually increases. When released, the brightness stops at the corresponding brightness at the moment of release. If the long press time exceeds 3 seconds, the brightness reaches maximum and stops changing. Another long press touch will gradually decrease the brightness, and when released, the brightness stops at the corresponding brightness at the moment of release. If the long press time exceeds 3 seconds, the brightness reaches the minimum and stops changing. This cycle continues.
- Click touch and long press touch can be used at any time without interference or restrictions on each other’s functions.
The LED touch dimming function without brightness memory gradually brightens and darkens is based on the LED touch dimming function without brightness memory that abruptly brightens and darkens. When turning on and off the light by touching, the light will transition smoothly from a lower brightness to the initial brightness when turning on, and the light will gradually dim from the current brightness to off when turning off, achieving a visual buffering effect of gradual brightness changes to protect the eyes and vision.
The LED touch dimming function with brightness memory gradually brightens and darkens is based on the LED touch dimming function without brightness memory, with the addition of brightness memory function. In the case of uninterrupted AC220V power supply, the brightness at each touch to turn off the light will be remembered, and the next time the light is turned on by touch, it will start at this remembered brightness. If there is a power outage in the AC220V power supply, the initial brightness when the light is turned on for the first time after power is restored will be fixed at 50% of full brightness.
- LED three-stage touch dimming function:
- When initially powered on, the light is off.
- Each touch will cycle through low brightness → medium brightness → high brightness → off in sequence.

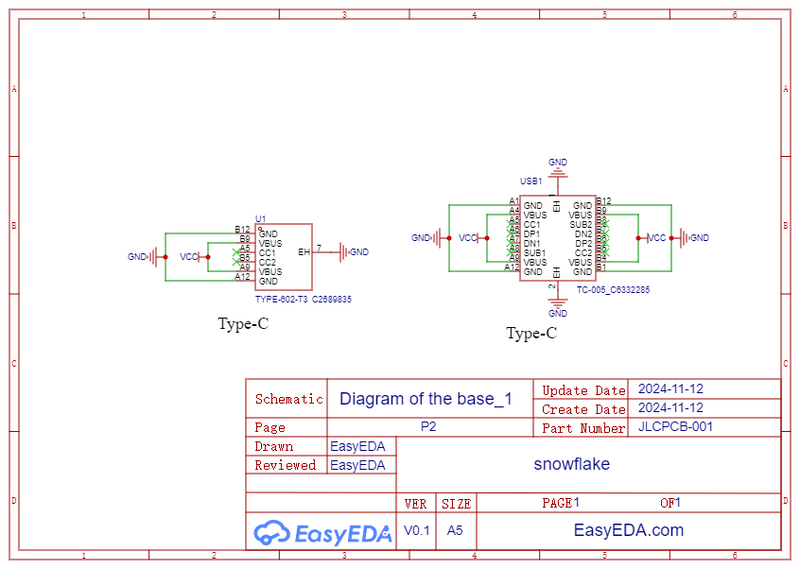
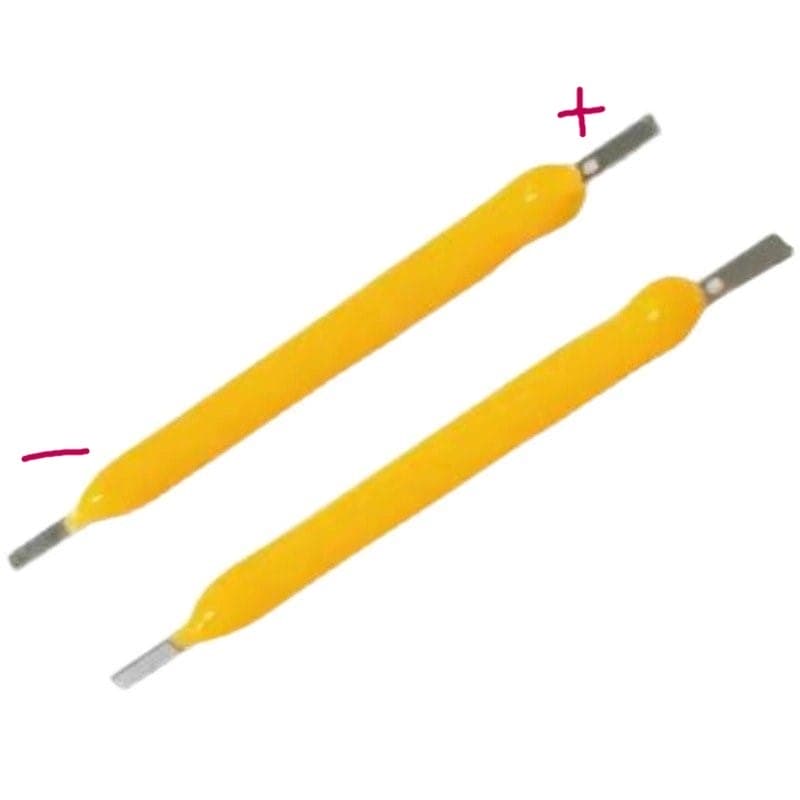
The snowflake light uses a total of 6 26mm 3V ceramic filament retro tungsten filaments. It is important to note that the filaments have positive and negative levels, so be careful when welding. Choose to directly use a 6P TYPE-C interface for power supply. For the convenience of welding, most people also use AtoC data cables for power supply, so we directly give up using C to C power supply. If the lights are not on after normal welding, check if your cable has C heads on both ends. Try using another A to C data cable.

The current color silk screen effect is very good, the colors are full, the picture quality is delicate, and it looks very beautiful and delicate even when enlarged up close!
Currently, the base without a casing has been verified. This base has two problems. One is that the type-c socket chosen is a heavy plate, so when the cable is plugged in it will be slightly uneven. It should be changed to a horizontal adhesive to make it flat. The second problem is that because a pattern solder mask is applied to the front, there is a risk of short circuit where the positive and negative are close together. The positive wire of the power supply has been moved to the back to avoid this problem. It is also worth mentioning that this base uses a 16-pin male type-C plug, with very short pins, making it difficult to solder with an electric soldering iron. It can only be soldered with a heating platform or hot air gun. If you do not have these two tools, it is recommended that you give up making the base.
The directional welding precautions have been marked in the diagram above. Please refer to the actual welding position and weld accordingly. The snowflake lights with colored silk screen have only left the solder pad positions in pursuit of beauty, and other component markings have been removed. Although the Type-C has been replaced with a better welding 6P plug, it is still necessary to carefully check for any soldering on the pins. 80% of the problems are caused by short-circuited Type-C pins. If there is no tantalum capacitor, you can directly replace it with an equivalent value surface-mount capacitor for welding.
It should be noted that there is a difference between the front and back of the acrylic on the touch surface. Because the shape of the snowflake lamp is not a completely symmetrical figure, if the edge of the acrylic on the back is found to be uneven during installation, it is not a problem with the acrylic cutting, but the shape of the pattern itself is not completely symmetrical. Just flip it over, and secondly, about the issue of sampling capacitors being able to adjust the touch sensitivity. I tested that when the acrylic thickness is only 0.5mm, you can control the snowflake lamp through the acrylic touch. Later, I will verify whether it is possible to adjust the touch sensitivity by replacing capacitors with larger capacitance, so that you can control the snowflake lamp through the acrylic without having to drill holes in the touch surface of the snowflake lamp, which will be more convenient.
When ordering PCBs with color silk screen printing, please note that there are some differences from the usual PCB ordering situation. Remember to select white for the color of the color silk screen solder mask, and also select free ENIG for color silk screen printing. The most important thing is to select the JLC EDA color silk screen for character processing. Everything else is the same as normal ordering, but one thing to note is that color silk screen printing does not default to adding customer codes! So there is no need to separately select and add customer codes to specified positions. Also, the screws used to connect the acrylic panel and the screws used to connect the acrylic shell of the snowflake lamp are M2 * 8mm screws and M2 nuts, and the screws used on the base shell are M3 * 10 (actually verified M3 * 7 length just right) screws and M3 nuts (if you don’t use a shell, you don’t need to buy this screw).
Haven’t completely figured it out yet, so I don’t know what to say. Maybe there will be skins for other holidays in the future? Let’s talk about it after I make the snowflake lamp symmetrical.
BOM Christmas snowflake light Circuit SGL8022W
| Parts | Value | Description | Quantity |
|---|---|---|---|
| Capacitors | |||
| C1 | 10nF | 0603 – SMD capacitor | 1 |
| C2,C3 | 100nF | 0603 – SMD capacitor | 2 |
| C4 | 10uF | case-a_3216 – Tantalum capacitor | 1 |
| Resistors | |||
| R2 | 47k (473) | 0603 – SMD resistor | 1 |
| R4,R5,R6,R7,R8,R9 | 20R (200) | 0603 – SMD resistor | 6 |
| R10 | 1k (103) | 0603 – SMD resistor | 1 |
| Semiconductors | |||
| D1~D6 | LED filament | LED filament 26mm 3V | 6 |
| Q1 | S8050 | NPN SOT-23 Bipolar (BJT) | 1 |
| U1 | SGL8022W | sop-8 Single-channel DC LED control touch chip | 1 |
| Miscellaneous | |||
| USB-C1 | TYPE-603-T3 | 3A 6P Type-C SMD USB Connector | 1 |
| BASE | |||
| USB1 | TC-005 | USB 3.1 Standing paste 16P Male Type-C SMD USB Connector |
1 |
| U1 | HX TYPE-C 6P SY | 3A 6P type-C SMD USB Connector | 1 |
Download files, links, and notes

- Download PCB in Gerber + BOM + Centroid file
- Mirror
- BUY IC SGL8022W
- BUY LED filament 26mm 3V
- Download PDF datasheet SGL8022W
- Download PDF datasheet S8050
Source https://oshwhub.com/lioasis/christmas-snowflake-lights


